Clip Title:
Shaping the Left Hand
Description:
Placing the First Finger
Channel:
507
Duration:
PUTING IT ALL TOGETHER: INSTRUMENT - BOW - FINGERS
Clip Title:
|
Shaping the Left Hand |
|
Description: |
Placing the First Finger |
|
Channel: |
507 |
|
Duration: |
4'53" |
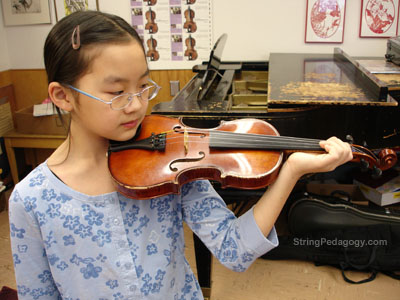
Shaping the left hand is introduced by reviewing the complete set-up regimen: instruments in rest position, feet together, make a V, take a step, tapping over the high dot, and sliding on the Magic X or C shapes back to first position. To avoid the crooked wrist syndrome,
 (The Crocked Wrist)
always begin instrument placement with the left hand over the high dot to help support a flexible and balanced relationship between the wrist and arm.
 (Left Hand Over High Dot)
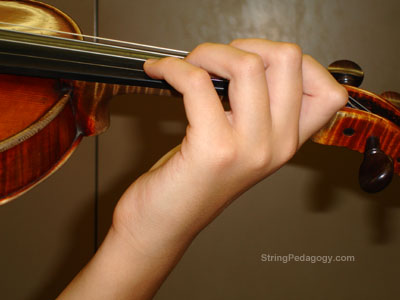
For violin and viola: Place tapes on the violin and viola fingerboard for the first and third fingers. Sliding down from the high dot on the Magic X, place first finger on the first finger line.
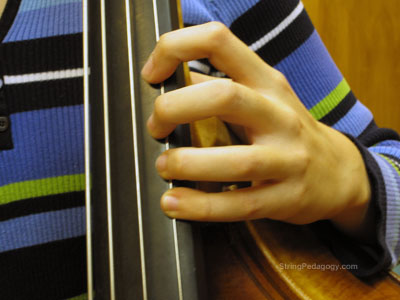
The proper left hand shape can be checked with the penny game. (The knuckle stays curved in a loose box shape).The teacher puts a penny on top of the knuckle and if the position is maintained, the student keeps the penny. (This is a good excuse for bankruptcy.) The teacher can also draw a face on the student’s finger nail that will face the student when the finger is placed correctly on the string.
 (The Penny Gane)
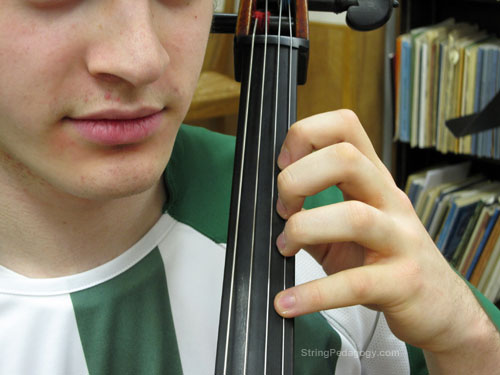
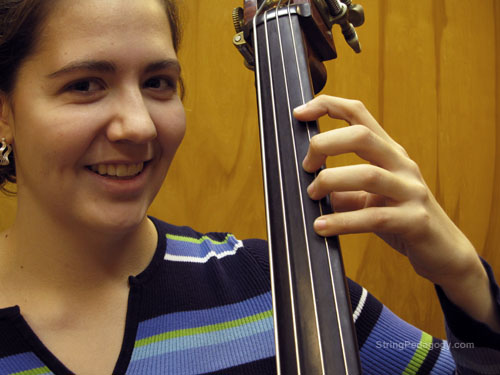
For cello and double bass: Place first and fourth finger tapes for the cello and bass. Sliding down with the C shape from the high dot, place the first finger on the first finger line. Check that the left hand wrist and arm are in alignment. Good alignment can be established by tapping up and down the fingerboard from first position to the bridge. Stay aware that the thumb remains opposite the 2nd finger.
 Cello
Cello
 Double Bass
For all instruments: Tapping the left thumb keeps tension in check.
See-Saw - The First Piece with the Instrument, Bow and Fingers
See-Saw introduces the use of the first finger on all instruments and is the first piece in ¾ meter.
(Score - Coming Soon!)
Clip Title:
|
See-Saw |
|
Description: |
Plucking, Singing, Bowing |
|
Channel: |
508 |
|
Duration: |
4'14" |
Violin / Viola
|
Cello / Double Bass
|
|
|
Twinkle Rhythms on Open Strings
Now is the time to introduce the Twinkle rhythms on the open strings. Define from the beginning the bow strokes that will be used for each Twinkle Variation. The 8th notes are played martele, 16th notes are detache, and quarter notes are legato. Also, the amount of bow to be used and where the notes will be placed on the bow are clearly defined. These basic bow concepts will be developed for many years.
Violin / Viola
|
Cello / Double Bass
|
|
|
Tiri tiri ti ti
Ti Tiri Ti Tiri or Grasshopper Grasshopper
Tiri Tiri Tiri Tiri or Mississippi is a River
Ti Ti Bend Ti
Theme
TWINKLE RHYTHMS WITH FINGERS - D Major Scale
Clip Title:
|
Fingers and Tetrachord |
|
Description: |
The D Major Scale |
|
Channel: |
509 |
|
Duration: |
5'37" |
The D Major Scale will provide the basis for most of the beginning pieces written for a heterogeneous string class. The teacher can isolate the tetra chords on the D and A strings, and then put them together to create the full scale.
Using the Twinkle rhythms that were practiced with open strings, the students can begin scale studies using each variation.
Initially, when descending down the scale, the students will stop and carefully place their 1st, 2nd and 3rd fingers for violinists and violists, and all fingers for cellists and double bassists. As the left hand fingers find their own natural shape, the fingers can be placed simultaneously. Block fingering, or “plopping” all the fingers on the string when descending, establishes spatial relationships between the fingers and encourages proper left hand position. (In the future, as the students progress to scale patterns that incorporate multiple finger patterns, independent fingers will be introduced.)
Clip Title:
|
Twinkle |
|
Description: |
D Major Twinkle for Everyone |
|
Channel: |
510 |
|
Duration: |
8'30" |
At this point in the journey, students are developing strong foundations and will be ready to work from a method book and play simple repertoire. Ongoing attention is given to setting the instrumental foundation and bowing skills. Music theory skills are studied separately as part of each class. All skills develop faster when approached individually. Reviewing beginning exercises and pieces continues to build the level of control and physical awareness needed to set the foundation for strong music making.