Part 5: THE VIOLIN AND BOW TOGETHER
Continue to review all the previous steps used to establish posture and violin position. Place the bow on the A string at the middle tape of the bow. Tap the first finger, middle two fingers and pinky on the bow. Make sure the thumb is not squeezing or pressing up against the frog. Have the student practice silent string crossings, G to E and back. Find the proper right arm level for each string by changing strings from the shoulder joint (i.e. the ball and socket joint where the shoulder meets the collar bone). Avoid raising or lowering the shoulder itself.
The beginning repertoire until "O Come Little Children" is played in the upper half of the bow, using and releasing the forearm.
Play "A-E-A" with the upper half of the bow using a ringing martelé and the forearm motion. (With the correct instrument size, the upper and lower arm form a right angle when the bow is placed at the middle tape.) Stop after each note on the new string to observe good string crossings. For most of the lesson, the teacher guides the bow which allows the student to develop good bowing habits. These include opening and releasing the forearm, a sense of arm weight, and good string crossings.
| Gee Dee Gee Vln Piz | Gee Dee Gee Pno |
Show the parent how to guide the student's bow.
"A-E-A" is played in String Academy concerts as follows: Pluck the entire sequence on G-D-G, D-A-D, and A-E-A in succession. Then, while the piano plays a short interlude, quickly pick up the bow. Play A-E-A with a good martelé two times. Start up-bow the second time.
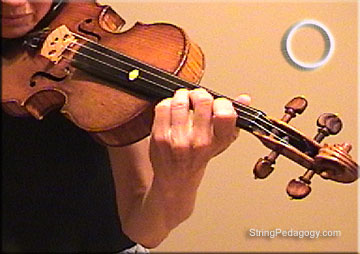
Shaping
the Left Hand:
Place the left hand over the high dot, tap all the fingers on
the G string side of the fingerboard using the Twinkle Variation rhythms.
Make sure all the fingers are loose. Then, slide the hand back to first
position on the "Magic X". Wiggle the left thumb and slide it
gently back and forth on the neck to make sure that there is no tension
in it. If the "Magic X" is lined up with the E string side of
the fingerboard, the hand will be in the proper position.
 |
|||
 |
 |
 |
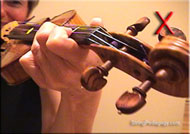 |
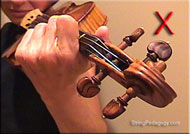
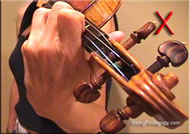
| Magic X is too high | Magic X is too low | Hand is not balanced back from the 3rd and 4th fingers | Wrist is crooked |
Preventing Problems in Shaping the Left Hand:
Clip Title:
|
The Violin and Bow Together AEA |
|
Description: |
Bow on the string, silent string crossings, tiri tiri titi on open A and E strings, AEA with the Bow, placement of 1st finger on the A string, See-Saw, teacher shaping the right and left hands of student |
|
Channel: |
107 | |
Duration: |
5'19" |
"See
Saw":
This is a piece of firsts for the student: the 1st finger, 3/4
meter, the legato stroke, and different bow speeds. Changes in bow speed
are introduced in the upper half with the "See Saw" rhythm.
Begin with the left hand over the high dot, and slide it down on the "Magic
X" before playing the first finger. This piece can be played two
times in performance.
Clip Title:
|
The Violin and Bow Together See-Saw |
|
Description: |
Bow on the string, silent string crossings, tiri tiri titi on open A and E strings, AEA with the Bow, placement of 1st finger on the A string, See-Saw, teacher shaping the right and left hands of student |
|
Channel: |
108 | |
Duration: |
5'19" |
| See Saw Vln | See Saw Pno |
Placing
1st, 2nd, and 3rd fingers:
From the beginning, it is important that the student feel the
correct balance of the hand. Without the bow, place the 1st finger on
the first finger line, the 2nd finger next to the third finger line, and
place the 3rd finger on its line. Check that the "Magic X" is
in the place where the 1st and 2nd fingers can be extended back comfortably
from the 3rd.
"See
The Little Monkey":
This is the first piece using fingers 1, 2, and 3. Play tiri
tiri ti ti on the A and E strings. Make sure that the student knows
the finger numbers of the left hand. You may want to write the numbers
on their fingers if the student is young and then play the following:
"See the little monkey (A), climbing up the mountain (B), climbing
way up high (C#), to pick the pink banana (D). See the little monkey (D),
climbing down the mountain (C#), climbing way down low (B), to eat the
pink banana (A)."
Clip Title:
|
The Violin and Bow Together See The Little Monkey |
|
Description: |
Bow on the string, silent string crossings, tiri tiri titi on open A and E strings, AEA with the Bow, placement of 1st finger on the A string, See-Saw, teacher shaping the right and left hands of student |
|
Channel: |
109 | |
Duration: |
5'19" |
A critical skill in string teaching is the teacher's ability to manipulate and mold both hands of the student.
String teaching is a hands-on activity.
|
Monkey Vln | |||||||||||
| Monkey Pno | ||||||||||||
| Monkey Jazzy Pno |
A Major Scale:
A one octave A major scale can be introduced at this point using the tiri tiri ti ti rhythm.
On descending to the A string, first place the bow on the A string and then carefully place the 1st, 2nd, and 3rd fingers. Then proceed to play.
Clip Title:
|
The A Major Scale |
|
Description: |
The A Major Scale with Twinkle Variation rhythms |
|
Channel: |
110 | |
Duration: |
2'40" |
By the end of the Twinkle Variations, all three fingers will be placed simultaneously (in the "PLOP" - see Part 6), but until this time, patience with placing the three fingers is fundamental to good left hand position. Practice the A major scale with all of the Twinkle rhythms as each variation is learned. (See Part 6)
SHORT STORY