Clip Title:
Setting the Proper Position
Starting to Play
Description:
Body positioning, high dot, and Magic X
rest position, tapping, sliding, and instrument stability
Channel:
502
Duration:
9'17"
SETTING THE PROPER POSITION
Clip Title:
|
Setting the Proper Position |
|
Description: |
Body positioning, high dot, and Magic X |
|
Channel: |
502 |
|
Duration: |
9'17" |
Body Positioning
This section hopes to clarify for teachers what can be done as a group and what issues are specific to each instrument in finding the ideal body balance.
All Instruments |
|
Cellists (and for violinists and violists who will sit in later stages) |
|
To establish proper body balance for all instruments, have the students begin by standing. This enables them to understand the relationship between the head, neck and back. Begin with feet together, make a shallow V and take a step to the side with the feet shoulder width apart. Find a good balance on the feet and sway back and forth like a Tree in the Wind.
For cellists’ first lesson, have them sit on the ends of the chairs with their feet flat on the floor for added support. Stay aware that the back is straight, yet not rigid, and for sure not hunched over. Also, check that the back is not swayback. A good (and fun) balance exercise to check for supportive posture is to have the students stand at a moment’s notice as in the Fire Drill. In this exercise the students sit and stand upon your command as quickly as possible, keeping their feet in the same place.
When sitting, violinists, violists and cellists need to maintain the awareness of a free torso that is able to rotate from the hips to free the upper body when the instrument is being played. Test this motion by asking students to gently circle in their chairs while keeping a lengthened body. Double bassists should be able to rock in a circular motion with a stance that has the left foot slightly in front of the right and both feet shoulder width apart.
Specific Cello Positioning Exercises
For cellists, the end pin is set at the proper height allowing the peg box to be at ear level. The knees are positioned just below the C bout and the instrument is angled so that it is neither too flat nor too vertical. Check that the cello is properly balanced by having the students ride a Roller Coaster (releasing their hands in the air while balancing the cello between their knees).
Specific Double Bass Positioning Exercises
Double bassists must have an athletic and balanced body position in order to properly hold their instrument. As with all the stringed instruments, set-up begins with the feet, which must be at a width that allows the player to balance the instrument against the body. Holding the double bass at arm’s length away from the body, the student will angle the instrument towards the center of the body, with the left knee touching the back of the bass. The students can drop their hands to their side allowing the floor and body to balance the instrument.
High Dot - Reference point at octave harmonic
All instruments are given a high dot, a piece of plastic tape or a sticker, placed at the mid-way octave harmonic point on the string that divides the string length into half between the nut and the bridge. The high dot serves as a reference point for many exercises.

Magic X
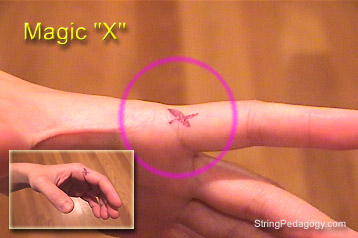
Violin / Viola |
Cello / Double bass |
|
|
All violin and viola students are given a Magic X, which is placed at the base joint of the index finger of the left hand. This X will serve as the reference point for proper left hand placement. Since cellists and double bassists play without the angled left hand approach of violinists and violists, teachers should not place a physical X on their hands, but rather shape the left hand fingers as a C with the 2nd finger opposite the thumb.