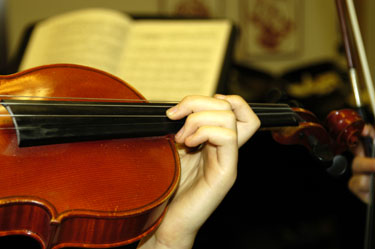
Clip Title:
Setting Up the Vibrato Impulse:
Tapping and Peg Knockers
Description:
Channel:
246
Duration:
VIBRATO LINK
Table of Contents
Releasing the vibrato impulse
Preparatory Vibrato Exercises
Exercises for Refining the Vibrato
Musical Expression - speed and style of the vibrato
Examples of Vibrato Exercises at the Book II Level
Releasing
the Vibrato Impulse
From the beginning, students are introduced to the larger muscular
motions used in vibrato. This occurs during the first lesson with the
tapping of the Twinkle rhythms over the high dot and with tapping on the
left side of the violin with the hand over the high dot. However, serious
vibrato training does not start until the student's hand position is relaxed
and comfortably set in first position. For some students this may occur
at the end of Suzuki Book I, while for other students it may take longer.
What follows is a general outline of vibrato studies. The teacher can
modify the outline as necessary to meet each student's needs.
The teacher works with a student to release the vibrato impulse from the wrist, arm and finger. It is important to keep the last knuckle of the finger flexible. Each student will find the most beautiful tone in different combinations of wrist, arm and finger motion.
The key to a beautiful vibrato does not lie in the tips of the fingers or even the hand, but in the suppleness and flexibility of the entire vibrato impulse. The vibrato impulse can be released only if the relationship of the body to the instrument is free from excessive tension. Look to the larger muscles and joints for answers to unraveling the tension problems that will limit the development of the expressive vibrato.
PREPARATORY VIBRATO EXERCISES
Setting Up the Vibrato Impulse
Tapping
Clip Title:
|
Setting Up the Vibrato Impulse: |
|
Description: |
Preliminary vibrato exercise | |
Channel: |
246 |
|
Duration: |
2'03" |
The first tapping exercise is used to help the student learn how to release the vibrato impulse. Begin by tapping the fingers over the high dot and on the left top side of the violin using a wrist motion. Tapping can be done on impulse or in rhythm: 1, 12, 123, 1234, 12345, 123456. When the student is comfortable doing this, move on to tapping in the first position, and then tapping while sliding up and down on the fingerboard.
Another tapping exercise is called Peg Knockers. With the hand in first position, release the wrist so that the knuckles fall back and hit (knock) the pegs. Gently knock the pegs in rhythm and on impulse as in the above exercises. It is important thing that the student becomes comfortable with releasing the wrist impulse motion used in vibrato. The wrist vibrato seems to provide a more flexible expressivity. The student, however, often ends up using a combination of wrist, arm and finger vibrato in their playing.
...the most useful vibrato exercise...
Wiggling Fingers
When all is said and done, this has proven to be the most useful vibrato exercise.
It lets the teacher monitor the left hand suppleness while the student is developing and learning the feel of a relaxed vibrato in the arm, wrist, and fingers. It also plants the sound of a beautiful tone in the student's ear. The teacher can begin this exercise around the Minuets in Book I. Thus, the sound and the physical sensations that create that sound are learned together early in the student's training.
Begin by having the student balance the violin against the teacher which releases the student's tension in the back and arm. The student's only responsibility in this exercise is to draw the bow and to hold up the violin. The teacher then wiggles the student's finger producing the vibrato tone.
One way of doing this is by using the teacher's left hand to hold the finger down and the right to wiggle the last knuckle. Make sure that the finger is pressed down enough to produce a good tone and that the student gets the feeling of releasing the last knuckle. The best vibrato is produced by releasing the last knuckle of the finger. The wrist, arm and finger vibratos are simply different ways violinists have found to produce and control this release.
It is important that the teacher shows the parent how to wiggle the student's fingers for everyday home practice.
Clip Title:
|
The Most Useful Vibrato Exercise |
|
Description: |
The teacher is shown wiggling the student’s fingers, releasing the vibrato impulse |
|
Channel: |
247 | |
Duration: |
3'13" |
EXERCISES FOR REFINING THE VIBRATO
All of the following exercises help to develop flexible knuckles.
When the student is comfortable with the larger wrist motions it is time to begin developing the smaller movements, such as releasing the last knuckle on the finger. The next exercises help to develop a flexible knuckle and are practiced by the student alone. The student should strive to maintain an even bow speed throughout the exercises. The exercises should be practiced with all fingers and using whole bows with even bow speed and pressure.
Releasing the Arm Vibrato
Mountains and Plains: Sliding on the fingerboard with flexible knuckles
Slide up to fifth position with the finger bent, then slide back with it flat. Repeat on each string. Also known as "going up with the mountain and down with the plain".Half Step Finger Slides
Slide the finger back and forth in half steps with the knuckle bent going up and flat coming down.
Clip Title:
|
Releasing the Arm Vibrato: Mountains and Plains, Half Step Finger Slides |
|
Description: |
Sliding on the fingerboard with flexible knuckles, sliding half steps with each finger |
|
Channel: |
248 |
|
Duration: |
2'43" |
Releasing
the Arm, Wrist, and Fingers
Wiggling on the Impulse:
This exercise is practiced in the fourth position. The goal is to train the finger to release backward in the impulsive vibrato motion. All three types of vibrato are practiced here.
1. Wrist - Rest the wrist against the shoulder of the violin and release the hand backward to flatten the knuckle. Make sure that the wrist remains in contact with the shoulder of the violin. Begin with the knuckle bent (this is the "wig-") then release the knuckle and wrist backward (this is the "-gle") in an impulsive movement. Rest or pause on the "-gle." Do one "gwiggle" per up and down bow, then 2, 3, 4, 5, and 6 "gwiggle's" for every up and down bow.
2. Arm - Repeat this procedure with the arm. This time make sure the heel of the hand lightly hits the shoulder of the violin on the "wig-" and releases back only as far as the knuckle will allow.
3. Finger Release - The student practices releasing the knuckle on impulse, releasing the knuckle only. Just let the knuckle "fall." This exercise helps identify the correct angle of the finger needed for a beautiful vibrato.
Clip Title:
|
Releasing the Arm, Wrist, |
|
Description: |
A vibrato exercise done in 4th position with measured notes releasing the arm, wrist, and fingers |
|
Channel: |
249 | |
Duration: |
4'35" |
Regulating the Impulse
Wiggling with the Metronome: Repeat 1, 2, and 3 from above. This time however, use a steady beat for the exercise, (metronome at 60, two clicks per bow) and let each set of wiggles fill up the two beats evenly. Play through without pausing after each set of wiggles from 1 to 6 per beat.
Clip Title:
|
Regulating the Impulse: Wiggles with the Metronome |
|
Description: |
A vibrato exercise done in 4th position with measured notes releasing the arm, wrist, and fingers and all done with a metronome |
|
Channel: |
250 |
|
Duration: |
2'16" |
One Finger, One String, One Octave
Use one finger to play through the one octave A major scale on the A string, alternating with open A after each note. Vibrate on each fingered note, and relax the hand during the open string. Complete the scale with 1st finger, then start on C# with 2nd finger through the scale, then start on D for 3rd, E for 4th. Remember to use the whole bow for each note.
Clip Title:
|
One Finger, One String, One Octave |
|
Description: |
Playing a one octave scale on one string with one finger alternating the finger with the open string |
|
Channel: |
251 |
|
Duration: |
1'27" |
Using the Trill to Release the Impulse
Trill exercises help create a more even vibrato. Measured trills have the same impulse as the vibrato. The Kreutzer Etude #15 is an excellent etude for this study.
Clip Title:
|
Using the Trill to Release the Vibrato Impulse – Kreutzer #15 |
|
Description: |
Teaching the first of nine trill etudes with the use of measured trills |
|
Channel: |
225 |
|
Duration: |
3'24" |
Releasing the Head, Neck, and Back
Place the scroll of the violin against a wall and lean into the wall releasing the tension in the head, neck, and back. Vibrate on any note using whole bows. Concentrate on producing a beautiful tone.
Clip Title:
|
Releasing the Head, Neck, and Back: Using the Wall for Support |
|
Description: |
The scroll of the violin rests against a wall which allows for the release of the head, neck, and back | |
Channel: |
252 |
|
Duration: |
1'02" |
Musical
Expression - speed and style of the vibrato
To gauge the speed and style of the vibrato, begin without vibrato
and a relaxed hand. When ready, let a little vibrato sneak in until you
achieve the desired tone. To maintain a continuous vibrato, keep the shape
of the hand consistent. Check that the angle of the wrist and arm stays
in the same plane. Remember to execute each shift with the whole arm.
Examples of Book II Vibrato Exercises:
Without the Violin
Pretend Vibrato: Wiggle the left wrist while singing or listening to the tape. Try to keep a continuous movement in the wrist.
Finger Flops: Rest each finger against the thumb and practice wiggling (releasing) the last knuckle.
With the Violin
Tapping over the High Dot: This gets the wrist motion flowing.
Peg Knockers: Tap the knuckle against the pegs by releasing the wrist backward.
Pot Scrubbers: Scrub the fingers on the string using a back and forth motion with the wrist.
Clip Title:
|
Vibrato Exercises at the Suzuki Book Two Level |
|
Description: |
Preliminary vibrato exercises |
|
Channel: |
256 |
|
Duration: |
4'03" |
...and finally....
CHECK THE ANGLE OF THE FINGERS.

The most expressive vibratos spin when the fingers are balanced on the fleshy full pads.